Thought I'd plop a copy of this here too. (All of the drawings are mine. Please don't repost without permission, thanks!)
There are many different successful strategies for killing the Balrog, so don't take this as gospel - it's just the way I do it. If you are unfamiliar with the encounter, this walkthrough can serve as a good introduction. Enjoy!
~HarpThe Balrog EncounterThe Balrog, Thaurlach, has been imprisoned by wizards and the elf-maiden Glathlírel for millenia. She guards him in hopes he'll attempt to escape one day and she can finally finish him. We're going to give her that chance! Thaurlach is being aided in his escape attempt by The Everseer, so we'll need to get him out of the way before we can kill the Balrog.
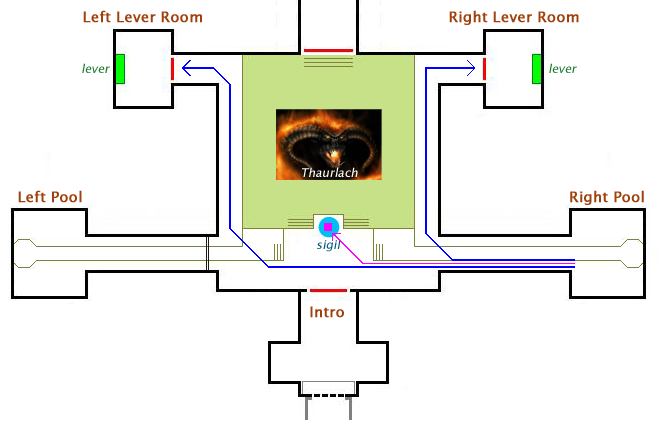
This encounter is essentially a very long escort quest. The raid must clear mobs around Glathlírel as she cleanses the waters in three parts the Balrog instance. Until cleansed these waters are the green, insta-death sort you see in Carm Dum (shown in green on the map below), and completely block access to parts of of the instance. Clearing them allows us to proceed to the lever rooms, and The Everseer room.

Once the waters are cleared, we can start attack The Everseer. Glathlírel remains with Thaurlach so we have our MT tank Thaurlach to keep her health up during this phase. Once The Everseer is dead, we kill Thaurlach.
Preparing for the Balrog EncounterPlease observe standard raid preparations:
* Be fully repaired.
* Be able to listen on Ventrilo. (Being able to speak is also helpful.)
* Bring 2 5 Hope Tokens. 30 minute tokens are helpful for this encounter.
For the Balrog encounter you must also:
* Meet at Glorfindel in Rivendel 15 minutes before start time.
* Bring ample Pure (level 55) Fear, Poison, Wound and Disease curing potions (not salves).
* Bring ample power and morale potions.
* Slot traits recommended for your class.
* Be familiar with the strategy described in the Walkthrough below.
* Be sure you don't have the Thaurlach raid lock (lock #8 from The Rift)
Encounter Walkthrough1. IntroductionDread Level: 0As soon as any member of the raid approaches Glathlírel ("the elf-chick") the encounter starts. Take care not to start the encounter prematurely! When you zone in, do not approach Glathlírel. Either gather just inside the door, or
carefully make your way to the sealed entrance on the far side of the room by hugging the left wall as you advance.

When everyone is ready, the raid leader will start the encounter and you will have 2 minutes to buff and eat food while Glathlírel recounts the lore of the encounter. She will be then unseal the doors. Be ready to move in when she does, or you can be locked out of the encounter.
Hope tokens are not required for this part of the encounter. 2. Left PoolDread Level: 4Glathlírel heads down the left hallway first to clear the pool. Glathlírel and the raid must clear the mobs, then she will clear the pool.
Two types of mobs spawn here: World-eaters, and Darklings. Darklings can also transform into summoned World-eaters. The MT will tank one world-eater, while CC classes keep other World-eaters and summoned World-eaters locked down. Kill darklings until the world-eaters spawn, then focus fire on the MT's target. Champs Clobber the MT's target. Everyone except the MT should try to stay directly behind World-eaters since they have a strong frontal AE attack. Take care not to break mezzes.
When all mobs have been cleared, Glathlírel will clear the pool so the water on the left side is no longer deadly. The route to the left lever room is now open.
Hope tokens are not required for this part of the encounter. 3. Right PoolDread Level: 4
Glathlírel next heads down the right hallway first to clear the other pool.
Be sure not to lag behind Glathlírel or you can be locked in the left pool room! This room should be handled like the Left Pool room. When all mobs have been cleared, Glathlírel will clear the pool so the water on the right side is no longer deadly. The routes to the both lever rooms are now open.
Hope tokens are not required during this phase. When you drop combat here, eat. If you do not have the Chain hope buff, buy DP hope at this time too.
If the entire raid doesn't not have the Chain hope buff, pop 30 minute hope tokens now.4. Lever PullsDread Level: 6Next Glathlírel walks back to the Sigil in front of the Balrog.
Do not lag behind Glathlírel or you can be locked into the right pool room!' Once at the sigil, she instructs us to send folks to pull the levers that will clear the waters around the Balrog. These levers are in the left and right lever rooms. DO NOT wait for these instructions! Instead send your teams to the lever rooms as soon as the right pool room is clear so they are waiting at the doors of these room when they open.
The keys to this phase of the fight are
speed and
timing! If the levers are pulled too slowly, the Balrog will damage Glathlírel faster than the minstrels can heal her. There are lots of different team makeups that work for pulling the levers, but teamwork and coordination are required to ensure the player pulling the lever is not interrupted.
(Some strategies also try to trap the adds in the lever rooms. This is helpful, but not necessary to win the encounter.)
Everyone not involved in pulling the levers should go to the sigil.
* Minstrels must heal Glathlírel like crazy until the water clears.
* When the water clears, a minstrel should drop a Hopeful Heart spot on the sigil.
NOTE: If you steal Thaurlach's agro from Glathlírel you may get an "eye" debuff (white eye with a red iris). This is the "chain pull" attack, and Thaurlach will summon and kill you after a few seconds unless you are able to break LoS or run out of range. Some strategies intentionally steal the agro (usually a hunter does this) in order to reduce the damage Glathlírel while the levers are being pulled.
Back at the Sigil After the Level PullsNo one except the MT should attack Thaurlach at this point. The instant the waters clear, the MT should jump into Thaurlach's melee range and taunt like crazy. The rest of the raid should meet back at the sigil to clean up the mobs that came from the lever rooms. You can fight near Glathlírel for a nice regen buff, but it's not necessary to stand directly on the sigil. Just like the Left Pool fight, the tank (OT now) should tank one World-eater facing away from the raid while CC classes mez the others.
After the adds are down, everyone should group up and pop 30 minute hope if it hasn't been popped yet. Be sure the MT is in range to recieve it!
Moving to The EverseerWhen the last add dies, give the MT stun immunity and a captain's Hope flag. Then raid should move to the Everseer room, but stop before the steps. Select a route around the back of the Balrog to avoid getting hit. If hope needs to be repopped pause briefly to do it, but don't linger (you'll risk more hope wipes). Going up the steps to the The Everseer room starts that phase of the encounter.
5. The EverseerDread Level: 8As the raid enters The Everseer room, the Everseer turns and walks to the back of the room.
Everyone must enter the room quickly, since the doors close after a few seconds. The Everseer has deadly attacks which the raid must work to avoid or prevent. Some of these are directional and line-of-sight, and others can be interrupted. In addition, darklings spawn in the corners of the Everseer's room. These must be killed before they reach holes between the pillars, or they spawn summoned world-eaters.
The OT (either a champion with heavy shield, or a guardian) should agro the Everseer and turn him so that he's facing the wall, away from the Balrog room. Meanwhile:
* Other melee should attack the Everseer from the back to avoid his frontal attacks
* LM should maintain stun immunity on the OT throughout the fight.
* LM should clear wounds on the OT and others as possible
* Minstrels should maintain LoS to heal, but try to keep a pillar between themselves at the Everseer
* Champions should Clobber the Everseer each time he starts a casting animation
* Burglars should maintain Addle and Counter Defence on the Everseer
* Hunters should focus on clearing darklings

After the Everseer room is clear, the raid has an indefinite time to prepare for the final phase of the fight. You will remain in combat, however you can wait to regen power and health, pop fresh hope, and wait for skills on cooldowns to refresh.
When the raid is ready to proceed to the Balrog phase, everyone should move out of line-of-sight of the doors. One member should pull levers 1, 2, and 4 to open the doors.
6. ThaurlachDread Level: 10Now that The Everseer has been dispatched, only one foe remains: Thaurlach. During this phase the MT pulls the Balrog into The Everseer room where the pillars will help protect the raid from his many deadly attacks.
Pulling Thaurlach to the Everseer RoomMoving Thaurlach to the Everseer room is one of the riskiest parts of the fight. Thaurlach's damage to the MT increases as soon as the doors reopen, so this part needs to happen fast.
* When the doors open, the MT heads for the Everseer room. Both Thaurlach and Glathlirel follow.
* Minstrels need to be prepared to heal the MT as heal reaches the Everseer room -- he'll be hurting!
* Someone in the MT's group should be ready to pop hope for him if he's been wiped.
Positions Everyone!The MT positions Thaurlach as shown below: between the back pillars and turned slightly toward switch 3.
* Minstrels and LMs position themselves with LoS and range to the MT, but out of LoS of Thaurlach.
* Melee take up position by the Balrog's right foot.
* Hunters to be in range and line-of-sight to clear poison effects on the MT.

Minstrels and LMs take up position by the left pillar. They are dedicated to keeping the MT alive throughout this fight. (It's critically important to keep the MT alive thoughout the fight.)
* Minstrels heal the MT (to the exclusion of healing other members of the raid)
* Captains heal other members of the raid, and Glathlírel
* Captains are the first to rez anyone who falls (so minstrels can focus on healing the MT)
* LMs keep stun immunity on the MT
* LMs clear wounds and disease on the MT
* Hunters need to be clear poison on the MT
Melee must rely on heal pots, regen, and captains for healing. If you are hurting and need a heal, back around the pillar until you get one.
125k: "Use Gloves!" "Hope Spot!"At 125k or so, all members of the raid that have Rift gloves should use them for the shadow mitigation effect. A misntrel should put down a Hopeful Heart spot for the MT at this point too.
120k: "Baleful Roars, Poison and Pukes"Somewhere around 114-120k health Thaurlach may do a Baleful Roar, wiping hope on anyone not hiding behind a pillar. He may do this again around 85k.
Around 100k, he starts to do a periodic "puking" attack. This puts several several disease based effects on the MT that must be cleared by the LM immediately. Burglars can Addle to reduce the number of times he gets this attack off.
He also uses a poison-based "eyeball" attack on the MT. This needs to be cured with a Poison potion or by a Hunter within 10 seconds or the tank will be instantly defeated.
55k: "The Jump"At 55k health, Thaurlach will start jumping into the air. He hovers for a few seconds and then comes down with a massive AE attack that instantly defeats everyone who is nearby and in line-of-sight.
He jumps fast and high, so you might not actually notice the "jump." If he suddenly leaves your screen -- look out! He's jumping!
Each time he jumps, hide behind the closest pillar. Remain behind the pillar until after he lands. He repeats this attack every 30 to 60 seconds until he reaches about 12k health.
12k: "Save The Elf-Chick!"At 12-15k, it's time to burn the big guy down. Use a conjunction on him and go all red/yellow. Also use Oathbreaker's Shame, Heart Seeker and any other high damage attacks to bring him down as quickly as possible.
Minstrels should switch to healing Glathlírel to the exclusion of everyone else at this point.
When his morale drops below 10k, he will spin around and make one last furious attempt to defeat Glathlírel. The MT and any other players with taunts should fire off their taunts to get the agro off of Glathlírel ASAP.
If Thaurlach dies before Glathlírel does, you win!


 Tue Oct 28, 2008 1:10 pm
